【Deep Dive Essays】5 Best Mountains for Beginner Hikers Near Tokyo — A Guide's Perspective on Choosing Your First Peak
北村 智明
稜線ディープダイブ


The bowline knot is called the “King of Knots.” However, incorrect tying methods or inappropriate usage can be life-threatening. This article thoroughly explains the most versatile loop knot, from its principles to practical application. Correct tying methods and usage guidelines that beginners must understand.
Article Information
目次
There are dozens of knot types in rope work. Among them, the bowline knot is called the “King of Knots” for good reasons.
First, the size of the loop doesn’t change. Even under load, the loop neither tightens nor loosens. This characteristic enables its application in various situations.
Second, it’s relatively easy to untie even after loading. Many other knots become extremely tight when heavily loaded, making them difficult to untie. The bowline knot maintains its structure even under load, allowing for easy release.
Third, it can be tied quickly. With practice, it can be completed in about 10 seconds. This enables rapid response in emergency situations.
However, it’s not perfect. The bowline knot has clear weaknesses. Using it without understanding these weaknesses invites danger.
Let’s consider situations where the bowline knot is useful in general mountaineering, not climbing or alpine climbing.
Anchoring to Trees
Securing gear or body to trees during rest. Simple safety tether for fall prevention during work on steep slopes. Assistance when passing wet rock sections along streams.
Securing Gear
Tent guy lines, bundling equipment, and bear bagging (hanging food from trees). While these don’t directly relate to life safety, they enhance comfort and safety.
Emergency Response
Transporting injured persons, bypassing collapsed sections, auxiliary anchoring on unexpected rock sections. In such situations, the ability to quickly create a reliable loop becomes crucial.
However, I repeat: the bowline knot cannot be used in all situations. Understanding its limitations is the prerequisite for safe usage.
The structure of the bowline knot appears complex at first glance, but its principle is simple.
Create a small loop in the middle of the rope. Pass the working end through this loop, wrap it around the standing part of the rope, and return it through the loop. The working end then grips the standing part, and when loaded, it tightens to lock.
The key is the combination of “friction” and “compression.” Under load, the working end compresses the standing part while simultaneously the small loop fixes the working end. This interaction creates the knot’s strength.
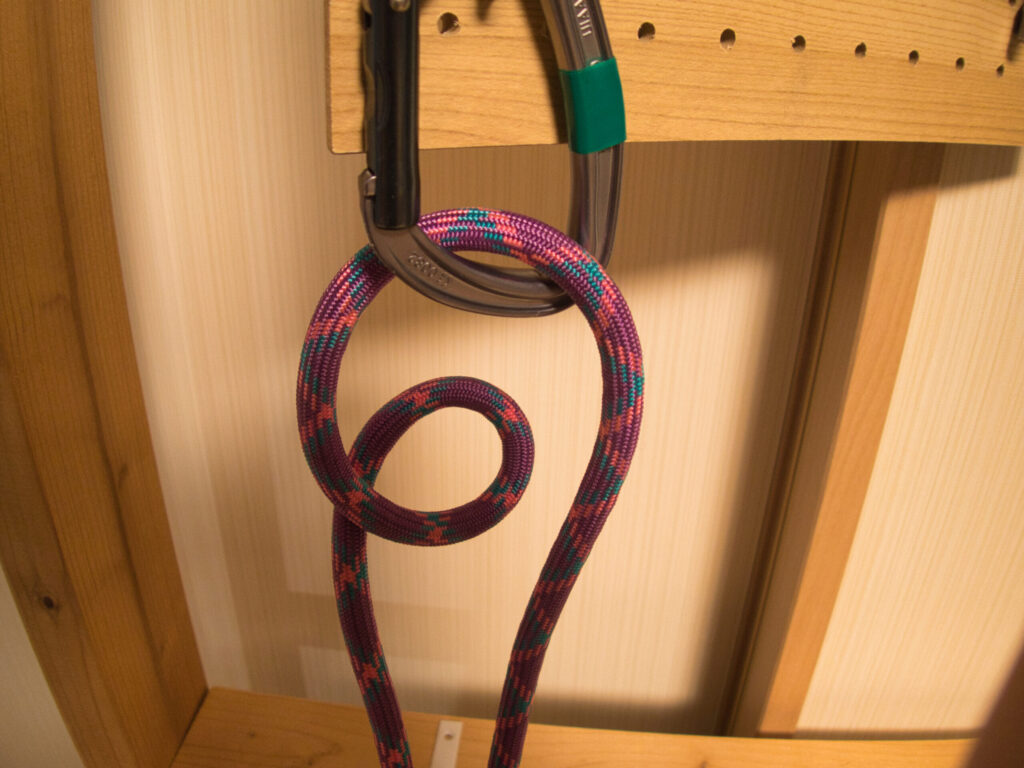
There are several methods for tying the bowline knot. Here we’ll explain the most basic “rabbit hole” method.
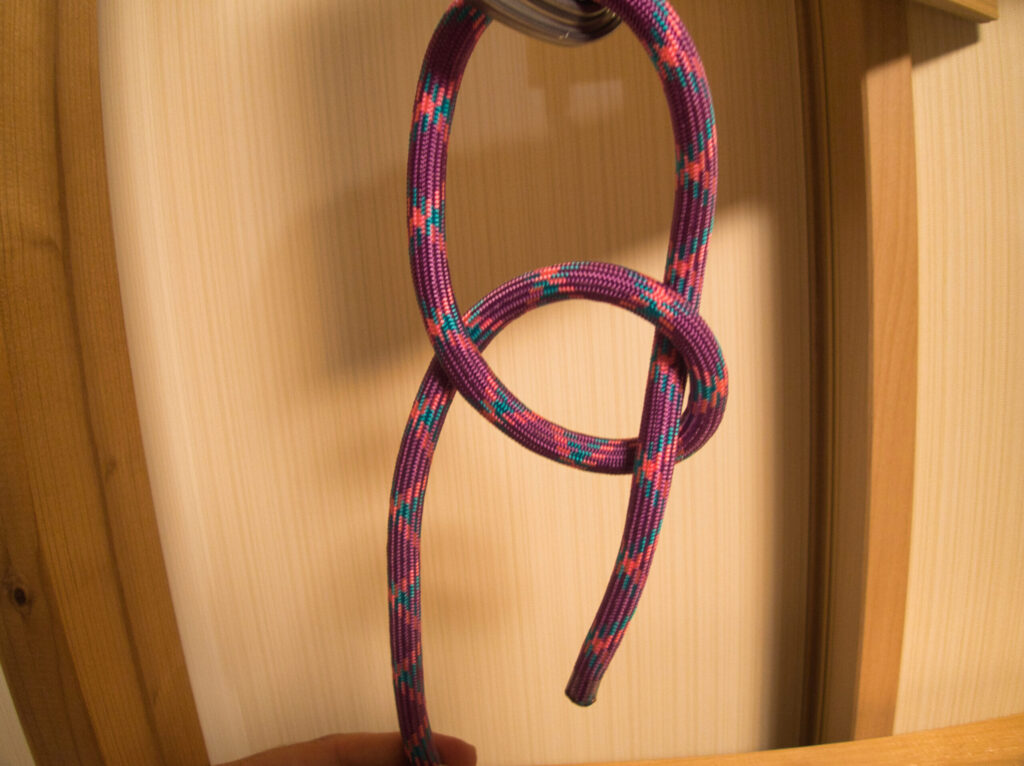
Step 1: Create a Small Loop
About 50cm from the end, create a small loop in the rope. Remember this as the “rabbit’s hole.” Create the loop so that the working end crosses over the standing part. This orientation is extremely important.
Step 2: Pass the End Through the Loop
Pass the working end of the rope up through the loop from below. Remember this as “the rabbit comes out of the hole.” Ensure the working end extends 15-20cm beyond the loop.
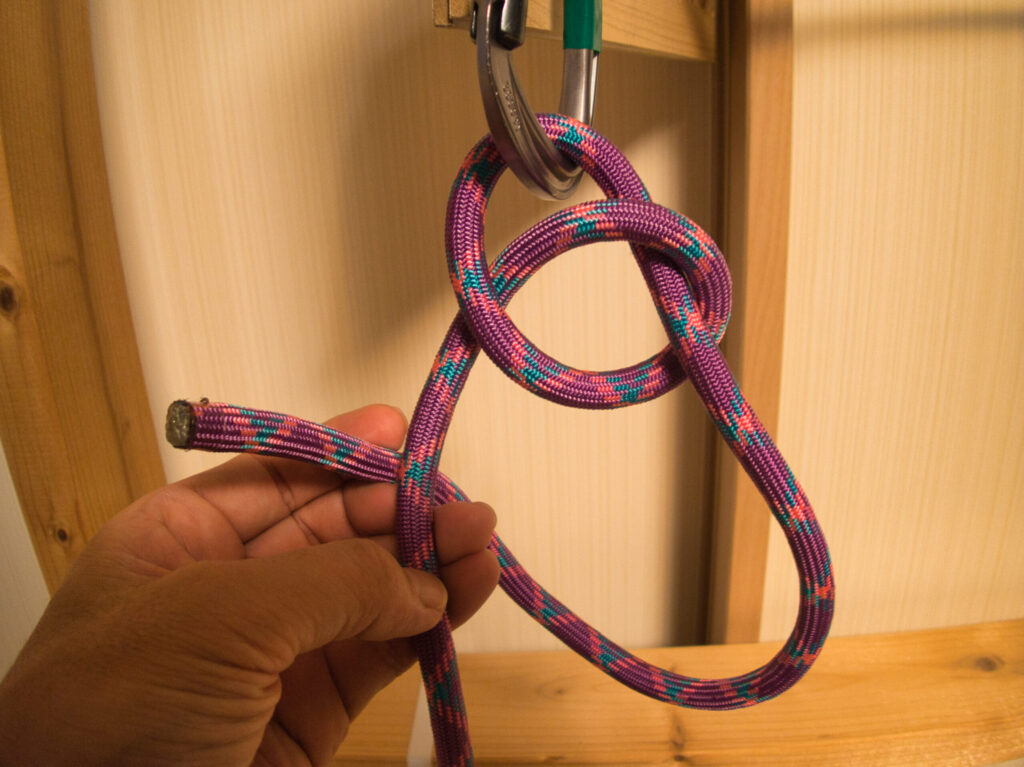
Step 3: Go Around the Standing Part
Take the working end under and around the standing part (the side creating the loop). “The rabbit goes around the tree.” If you pass over the standing part instead of under it, you’ll create a completely non-functional knot. Always pass underneath.
Step 4: Return Through the Loop
Pass the working end back through the small loop. “The rabbit returns to the hole.” This time, enter the loop from above.
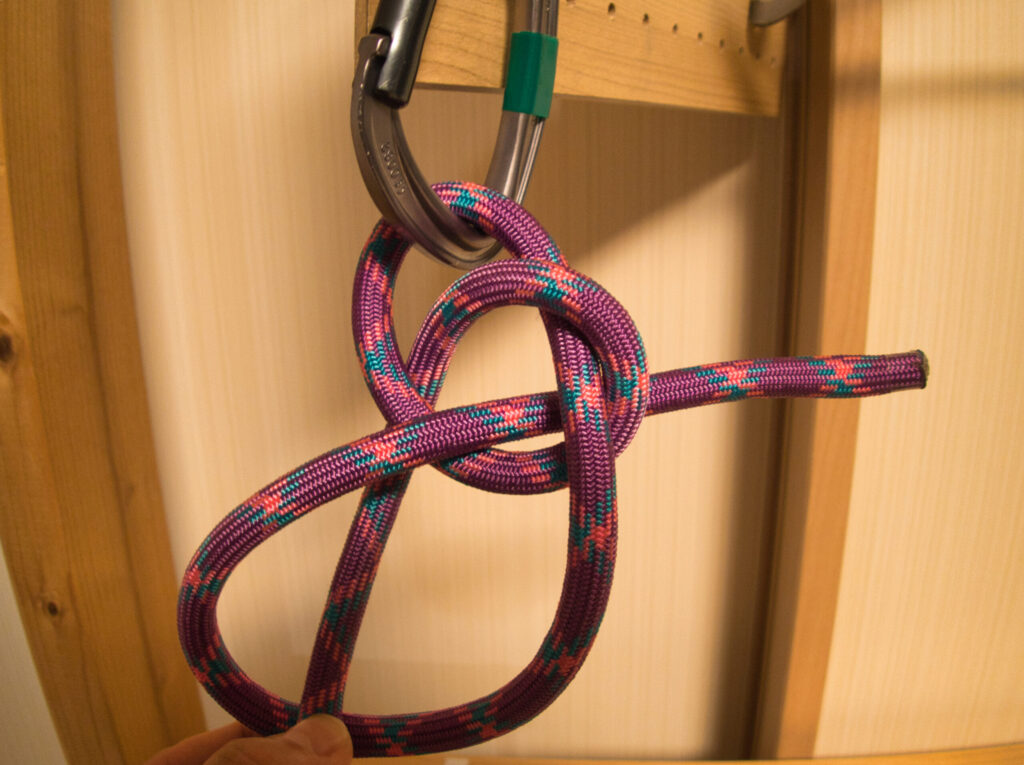
Step 5: Tighten
Pull both the large loop and the standing part to tighten the knot. Adjust so the small loop is an appropriate size. Confirm that the working end has at least 15cm of tail remaining.
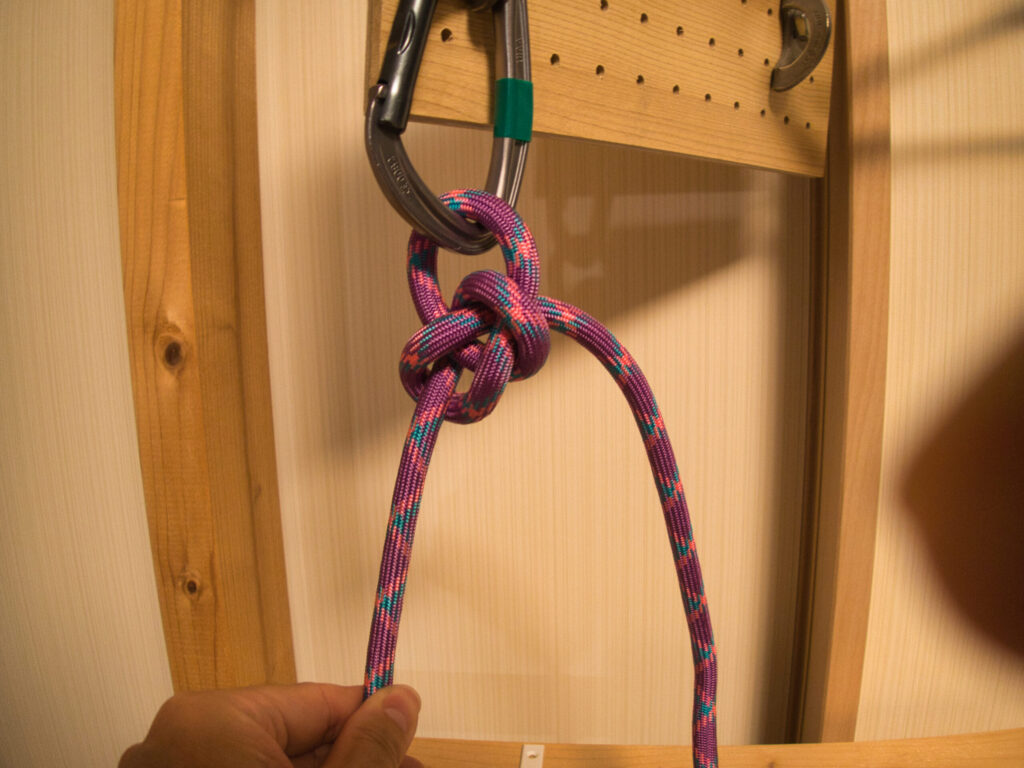
After tying, always confirm the following:
Position of the Working End
This is the most important check. Is the working end emerging from the “inside” of the small loop? If it emerges from the outside, it’s a “false bowline” that’s completely non-functional.
Specifically, the working end and the standing part (the side creating the loop) should be on opposite sides of the small loop. If they’re on the same side, it’s wrong.
Shape of the Knot
When tied correctly, the working end should “embrace” the standing part at the small loop. If you can’t see this shape, the path is likely wrong.
Length of Working End Tail
At least 15cm is essential. Under load, the knot moves slightly. If the tail is too short, there’s a danger of the end pulling through.
Tightness of the Knot
If too loose, strength decreases. However, you don’t need to tighten it forcefully. Learn the appropriate tightness through practice.
Path Errors
The most common mistake is passing over the standing part in Step 3 instead of under it. This doesn’t fix the working end, and the knot will slip under load.
Wrong Loop Orientation
Some people make the mistake of creating the loop in Step 1 with the top side crossing under. This also creates a false bowline.
Insufficient Working End Tail
Thinking “this much should be fine” and leaving it short can result in the end pulling through under load. Consider 15cm as the absolute minimum.
Appropriate Situations

Inappropriate Situations

Why can’t it be used in these situations? This is due to the structural weaknesses of the bowline knot.
Weakness to Impact Forces
The bowline knot is strong against slowly applied static loads. However, it’s weak against impact forces like those from falls. The knot can shift momentarily, potentially reducing strength.
For this reason, it’s not used for harness connections in climbing. The figure-eight knot is the standard instead.
Weakness to Bidirectional Loads
The bowline knot assumes unidirectional load: the loop bears weight, supported by the standing part.
However, when the standing part is also loaded simultaneously, the knot can shift and loosen. While it doesn’t completely fail, reliability decreases.
Risk of Slipping When Loosened
The bowline knot is stable when constantly under load. However, when load is repeatedly applied and released, it can gradually loosen.
In an extremely loosened state, the knot could potentially even untie in the worst case. This is why it cannot be considered “absolutely safe.”
To compensate for these weaknesses, backup is recommended.
Adding a Fisherman’s Knot
After creating the loop with a bowline knot, tie a fisherman’s knot with the working end around the main rope. Wrap the working end twice around the main rope, pass it through the wraps, and tighten. This prevents the end from pulling through even if the bowline loosens.
This addition greatly improves safety. Especially in situations where loading is unstable, don’t omit the backup.
Double Bowline
You can also tie with a doubled working end. This increases strength but makes the knot larger and harder to untie. Choose based on the situation.
Don’t Use for Climbing Applications
Even with backup, don’t use it in situations with impact forces. This is the most reliable “backup.” Choosing the appropriate knot itself is fundamental to safety management.
Case 1: Body Anchoring to Trees
When working on steep slopes, you want to anchor your body to a tree. In this case, create a loop with a bowline knot and pass it through your harness or chest. Add a figure-eight knot in the working end as backup.
The load is relatively static, and the tree supports you if you slip. This is an appropriate situation for the bowline knot.
Case 2: Bear Bagging (Hanging Food)
For bear countermeasures, hang your food bag from a tree. Throw the rope over a branch, create a loop with a bowline knot, pass the food bag through the loop, and hoist it up.
The load is static and not bidirectional. Ease of untying is also important, making the bowline knot optimal. In this case, backup is probably unnecessary.
Case 3: Simple Auxiliary Anchoring
In wet rock sections along streams with unstable footing. Create a loop with a bowline knot on an upper tree and connect to your body with a carabiner.
This is auxiliary anchoring, not full body weight support. However, backup should be added just in case.
Case 4: Example of Inappropriate Use
Rock climbing, direct connection to harness. This must absolutely be avoided. The bowline knot cannot be trusted against fall impact forces. Always use a figure-eight knot.
Mastering the bowline knot requires repetitive practice. At home, use practice rope about 8mm in diameter and repeat until you can tie it without looking. Inexpensive rope from a hardware store is sufficient.
As you become proficient, practice under difficult conditions like tying with eyes closed or wearing gloves can be effective.
During practice, always confirm the following aloud:
“Is the working end emerging from inside the loop?”
“Is the working end tail at least 15cm?”
“Is the knot properly tightened?”
This habit translates to safety in the field. No matter how experienced you become, never skip confirmation.
Start with Low-Risk Situations
Don’t immediately use it in life-trusting situations. First use it in low-risk situations like securing gear or auxiliary anchoring during rest.
Always Double-Check
After checking yourself, have an experienced person review it if possible. “Probably okay” is forbidden.
Don’t Use If Uncertain
If you’re not confident in the tying method or the situation feels inappropriate, the judgment not to use it is also important. Relying on the more reliable figure-eight knot is also an option.
Remember with Rhythm
“Out of the hole, around the tree, back to the hole.” Practicing while chanting this rhythm helps your body remember.
Learn from Mistakes
When you make a mistake, think about why. Path errors, loop orientation, working end position. Understanding the cause prevents repeating the same mistakes.
Teach Others
The best learning comes from teaching others. Explaining deepens your own understanding. Practicing with mountaineering companions is also a good method.
Characteristics of the Bowline Knot
Appropriate Situations and Limitations
For Safety
After reliably mastering the bowline knot, it’s good to learn the figure-eight knot next. The figure-eight knot is useful in situations where the bowline knot cannot be used, being a more reliable knot.
Mastering both enables appropriate choices based on situations.
The bowline knot is the “King of Knots,” but even kings have limitations. Understanding that it’s not perfect and using it in appropriate situations is important.

And above all, not using rope work is best. Through appropriate route selection and careful action, situations requiring rope use can be avoided.
However, having emergency preparedness expands your range of action. I hope this article becomes a step toward safe mountain travel.
Practice Equipment
Practice Rope: 8mm × 3m approximately
Carrying Rope: Auxiliary rope 8mm × 30m
Carabiner: HMS-type locking carabiner